I can not even begin to tell you the number of electric pencil sharpeners I've burned through. For years, I swore by a particular brand of industrial sharpener because it outlasted the rest, but even that one eventually burned out. I just accepted it as a way of life until I started reading about this miraculous pencil sharpener all over blogland from Classroom Friendly Supplies.


With its glowing reviews from people I really trusted and a price tag of about half of what I was used to paying for my usual electric sharpener, I didn't hesitate to order one. {If you're a blogger, check their site for a great blogger review program.} I will admit, I had to watch the video on the website more than once to get the gist of how to use it, but the kids definitely caught on faster than me! Just as the website promises, the sharpener is quieter than any other I've ever used, either electric or manual, but what I was not expecting was the amazingly long and sharp point!
You can see that I wrote "front" on mine (which is a little worn off from use). This was before I found a good place to secure it down using the enclosed clamp. A little tip - I added a strip of heavy duty velcro under between the pencil sharpener and the table before securing the clamp which has really improved the grip.

I fell so in love with the sharpener, that I've ordered 4 more to give as gifts and have at home. I was hesitant to turn this sharpener over to the kids because, well...I love it! And we know what happens to pencil sharpeners in the grasp of curious 7 year olds. But I have to say, I taught two kids how to use it and they were in charge of teaching the others how to use it. They were super protective of it. I should have taped them giving their little how-to-sharpen workshops because they were adorable!

I have two in my room. One for the kids and one for me. I have one at home and sent one to my husbands school which as resulted in the same kind  of sharpener envy that people didn't even know was possible!

I love this little guy so much, I'm buying another one to give away! But this time, one of my lovely blog readers will have the chance to give him a home. That's some love right there. Enter using the Rafflecopter widget below. The entries are pretty simple. Follow me on Facebook, Pinterest and/or the blog depending on how many times you would like to enter. If you already follow me in all of those places, yay! You can just click the boxes. If not, you can either follow the link from the widget or use the links on the right to lead you to my Facebook and Pinterest accounts and to follow via email or Bloglovin.  Good Luck & Happy Sharpening!


a Rafflecopter giveaway

Kids look forward to their birthdays with such excitement and expectation, that we really have to do something special to help them celebrate their special day. I've tried a few different ways to celebrate birthdays, in fact you can see some of them here.

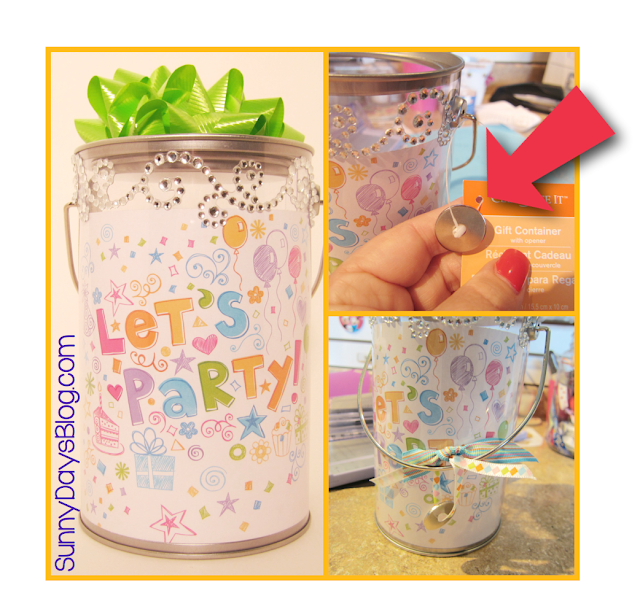
I wanted to do something new this year, so I picked up one of those clear paint cans at Michaels when I was shopping for the Create2Educate Sweepstakes and turned it into a little birthday treat container!
See that little metal doojiggy thing hanging off the handle? DO NOT throw that away! That's how you open the can. I only found this out after standing in the aisle for about 10 minutes wondering how the heck you were supposed to get into this dang can! At one point I convinced myself that maybe you weren't supposed to be able to open it. After I worked up a sweat,  bent and broke a few nails, almost crushed the darn thing and said some not-so-nice words I actually read the tag. And calmly put the pretty little can in my basket and headed for the register. And some aspirin. So learn from my mistakes, people. You're welcome.
The "Let's Party" printable is just printed on regular paper and placed inside the can. I was going to tape it but it just kind of stuck there. There is surely some super cool scientific explanation why it stuck there because of static electricity and plastic particles molecularly attracting to the polymers or something, but I won't get all Sheldon Cooper on you. It stuck by itself. It was cool. Download the printable here if you want it.

I decorated the outside of the can with a strip of fancy rhinestone stickers. How cool are they? They peel right off in one piece and stick wherever you put them. They were a bit too long for the top of the can, so I just snipped the little glue strip right between two rhinestones to cut off the extra. A bow on top to finish it off and some ribbon to attach the all-important opener, and our birthday treat can is complete!

I'm not exactly sure what I'm going to put inside. I have birthday brag tags but they might seem kind of lonely in that big can. I was planning on making some birthday coupons, but my to-do list is getting longer than my days left to do it all. If all else fails, I believe a bag of candy will do just fine...


When I was at Michaels shopping around for my #Create2Educate Sweepstakes, which you can read more about about here, I loaded up my cart with a lot more than I needed for to make my Get to Know Me Necklaces...

Under that pile of awesomeness, are two packs of paper that I just couldn't pass up. I'm a sucker for chevron and polka-dots and I love buying packs of paper that are coordinated so that I know they'll all mesh together if I use them on a project.
I really had no idea what I was going to use them for and then I got this baby for my birthday! I had mentioned to my hubby that I wanted to make one of the famous "teacher toolboxes" and he remembered! awww...
I had originally planned to use these super adorable labels I found on Fun in Room 4b, but when I printed them out I realized they weren't quite the right categories that I wanted and they were a bit more pastel than the rest of my room. So I set about making my own. All those posts that say how easy breezy this project is...well, I'm not gonna lie. This was an all-dayer for me. And I'm pretty crafty!
So, if you're contemplating making one, let me tell you some things I learned along the way to maybe make it a bit easier on you. First, here's the finished product, which I love:

Some of the labels look a little crooked, but I think it's because the drawers aren't really in correctly.  I did not paint the outside, although I did want to and not-so-secretly still want to, but really I think I'm going to just leave it be. I think. Maybe.

One of the hardest parts was deciding what would be in each drawer! Mine is going to be more of an extra supply holder behind my desk. I keep some paper clips, binder clips, and things in or on my desk, but I have the extras stored away. So, I had to really give some thought to what things I wanted to store in there or what things I don't really use every day but want to keep handier than in the closet.

Next was figuring out how I wanted to label them. I decided to go bold.  I just printed out those labels and cut them out to put on top of the chevron paper. If those labels float your boat, you can download them here but they're nothing fancy. I just printed them on paper and cut them out.

Then I cut a bunch of the chevron paper to the size of the boxes, which is 2x4 for the larger boxes and 1 1/4 x 2ish for the smaller ones...
I thought I would just randomly put the colors in, but it looked too mish-mashy that way, so I came up a bit of a pattern that didn't offend my OCD sensibilities too much:
At that point, nothing was taped in. One at a time, I took out the chevron square, added the label, and then taped it inside the drawer. I just used regular scotch tape on the inside of the drawer. It's not so pretty, but you can't see it from the front and it gets the job done. To top it all off I added a couple of owl stickers from the Carson Dellosa boho birds theme that I have going on in my room.

So that's my teacher toolbox! I'm glad I did it but it was definitely a little more of a pain in the badonkadonk than I imagined it to be. But it's done and I'm happy. And I'm not going to paint it. The blue is fine, really. Right?


I'm so excited to be partnering up with Michaels for their #Create2Educate Instagram Sweepstakes! First, I'm going to share one of the projects I do to start each year using some of the great products at Michaels, then at the end of this post, you can learn more about how you can have the chance to win a $50 gift card to stock up your classroom craft cabinet!
This is a great craft project for the first few days of school and it's a fun twist on the traditional "all about me" activities. I loaded up on beads and supplies from Michaels to get a head start on this year's necklace:


Basically, the kids follow the glyph, or code, to assemble a necklace that will tell things such as their age, how many pets they have, their likes and dislikes, etc. 
Click HERE to get the two printables below for the project:
I usually have the kids work on paper plates and arrange their pattern. This keeps most of the beads off the floor. I also have the kids wrap one end of the string around their non-dominant hand to keep the beads from sliding right off as they put them on. Trust me - that comes from years of experience...


When the beads are all on, I help them tie the cords. As soon as the whole class is finished, we roam the room wearing our new necklaces and use the "Find Somebody Who..." sheet to learn more our our new classmates! The kids always love this project and they end up wearing the necklaces long after that first day. If necklaces aren't your thing, try keychains or bracelets.

Michaels knows that fun projects like these are not usually funded by our schools and it's usually the teacher who spends their own money to bring creative project like this one to the classroom, so Michaels is kicking off the 2013/2014 school year with the #Create2Educate sweepstakes!

The guidelines are pretty simple:
Create your own Back-to-School project—anything from classroom décor and organization, to a learning activity for your students. Then, enter the Michaels sweepstakes by uploading a photo of your creation to Instagram using #Create2Educate.
Each day we’ll feature our favorite Instagram photos on the Michael’s #Create2Educate Pinterest board, and we’ll randomly pick one lucky teacher daily to win a $50 Michael’s Gift Card.  

Create as many Back-to-School projects as you’d like and upload photos of them to Instagram for more chances to win.

#Create2Educate opens for entries on July 21st and closes on August 3rd. Head to Michael’s and get inspired today.


Don’t’ forget that teachers get 15% off of their purchase all year long at Michaels!


When I went shopping, I loaded up my cart and I've actually made quite a few more projects. Here's a sneak peek. I'll be posting more detailed pictures, directions and free downloads during the week!


What are you waiting for? Go on, get your craft on!
Freebie Fridays


Today is my birthday, so let's celebrate!
For today only, July 19, everything in my TpT store is 20% off to celebrate my 20th birthday! Just go with it people...it's my birthday. I'm allowed to pretend. I'm off to enjoy a day of fun and relaxation. Yay for summer birthdays!


There's a reason that Kleenex is synonymous for tissue. You know when you see Kleenex on the box, you're going to grab a tissue that can easily handle anything from watching the end of The Notebook to a full on allergy attack or a bout with the common cold, which doesn't feel all that common when you're the one suffering from it.

So, when Kleenex sent me some materials to experiment with, I put my faith to the test and jumped right in. I asked two of my teacher friends to help me out with the experiment while I narrated and filmed. So here's our showdown between Kleenex with Sneeze Shield and an unnamed competitor brand:


You probably noticed that I said sneeze guard instead of sneeze shield...oops. I was going to redo the video, but I love Mrs. Morse's genuine surprise and I didn't want to lose that in a second attempt at filming the experiment.

After seeing the results of this experiment, my team and I will be sure to have plenty of Kleenex with Sneeze Shield in our rooms this year! Be sure to stay in touch with Kleenex through their Facebook page where you can see other experiments and be the first to know about other fun promotions and special offers.

There is no clear theme to this post, hence the title. Mash up sounds all cool when other people use it to describe things, so I thought I'd give it a whirl although I'm pretty sure I'm using it in the wrong context. I usually try to tie things together with some kind of unifying theme, but that is just not happening today. And it was actually holding me back from blogging, so here I am Themeless in South Florida. Figured it beat Blog Post-less is South Florida...

So to start with, I've been doing some school shopping. I purchased these stools from Ikea for $5.99. They're called Marius if you want to look them up and they come in white, black, and this funky blue which is what I got. I'm hoping to use these at my reading table. I have permanent indentations in my shins from the kids swinging their feet under the table. I'm hoping these stools keep their feet on the ground. We shall see. Either that or I'm going to have to start coming to small group in full catcher's gear. Here are the stools:
Which will hopefully eliminate my need to dress like this:

I'll let you know how that goes. A cooler, crafter blogger than me might take those stools and wrap the legs with chevron washi-tape or sew little pillows for their little tushies, but we're going to go straight-up industrial Ikea in my room with these bad boys.

I also bought these from Really Good Stuff. I could have bought a designer purse for the amount I paid for a class set, so if you have them and don't like them, please don't tell me.
I bought those book boxes because I finally actually read The Daily 5 for myself. Everything I know about D5 is from reading other posts and seeing it in other people's classrooms. My husbands's school did a book study on it and he brought his copy home. I picked it up, started reading the first few pages and was hooked! Last summer, I read Laura Candler's Power Reading Workshop and implemented many of those strategies, which have similarities to D5 so I'm already in that mindset, which wasn't that far off from my core of beliefs to begin with. So, in short, I'm super excited to be a Daily 5 girl now, and I have the book boxes to prove it!

I also tried to hit up my local Targets to find some of the cool Dollar Spot stuff that everyone is sharing all over Instagram that I totally don't really need for any specific purpose, and this is what I found. This is two different Targets!! And I even went back to one of them the next night and still found it empty but I was too sad to even take a picture. Now I know how Old Mother Hubbard feels...


As for my TpT worky-work, I finished another set of Common Core Essentials for 2.NBT.3, which covers counting and representing numbers up to 999 in various forms. Here's a peek at what's included in it. You can click HERE to get it on tpt.


The feedback on these have been music to my ears - thank you my friends! I am definitely continuing the series. The next one will most likely be Operations and Algebraic Thinking, since we'll need those before the rest of the NBT standards. Currently, I'm taking a teeny weeny break from these and working on my third grade CCSS version of my Weekly Word Work because I promised so many people I'd have it done by the start of the new school year. I'm sticking to my promise, I promise!

Now this next thing, you're totally going to dig. It's a collaborative blog specifically 2nd and 3rd grade!

Nice right? I'm so excited to be part of this amazing group. So check out the blog and be sure to enter our grand opening giveaway here!
And to cap off all my randomness, a few days ago I asked you to come up with another caption for the following picture:

So many of the entries actually had me laughing out loud, but the clear-cut the winner of my caption contest is...
Congrats Suzanne! Just email me with anything from my store that you might be able to use and I'll send it your way!


I am the least spatial person I know. I really am. Hanging bulletin boards and arranging desks are kind of nightmare activities for me. Luckily, like most people who know their weaknesses, I've developed some coping skills. So today I'm going to share a cool bulletin board trick that my husband taught me way back when I was student teaching (before he was my husband or even my boyfriend. This little trick may have been one of the reasons I fell in love with him...)

I'm often asked how I have such perfect arches on my bulletin board titles, like on my Brain Beads board (cabinet, actually) below:

That certainly did not happen by eyeballing it, my friends. Here it is in a little picture tutorial.  You just need a string and a pencil and you're good to go! I've had that same string and pencil combo in my desk drawer for as long as I can remember.
What to do with the line? I usually just leave it. It's so faint that you can't really notice it after you put the letters on and finish decorating the board, but if it bothers you you can erase it. If it's a hard surface, try a Magic Eraser. I love those things.

Ok, so that brings us to the...
I saw the picture below and the caption just popped into my head:
So what do you see when you look at that picture? Give me your best caption and you may be a winner! Just leave your caption in the comments on this blog post before Thursday, July 11, Midnight EST and if I like yours the best, you get to pick any item of your choice from my store. Easy Peasy, right? Can't wait to see what you guys come up with!

And PS Lindalouhoo - PLEASE EMAIL ME!!


No, me neither. In fact, here's a reminder about summer...


I'm nowhere near ready to go back, but I did just finish up my August and September Printable Pack! Last October I had the idea of making seasonal printables for each month so that I always had a nice collection of activities at the ready for things like unplanned absences, homework, morning work, center supplements, early finisher work, and those times when you just need the kids to have something to do on their own for a few minutes so you could catch your breath <--I mean we've all been there, right?

Since I had that bright idea back in October, I scrambled each month to have the next pack ready by the start of the next month. Which meant that most of the time, I was totally confused because instead of focusing on the current month, I was obsessing over the month ahead. I do strange things to myself. Now I'm happy to say I have ALL of the months completed! <insert chorus of angels singing here> I've had numerous requests to bundle them, but alas, I won't be able to because the file sizes are just too large.

I have to say, this pack might be my favorite. So much so, that I'm going to go back and update some of the older packs to bump them up to the standards of this one. I will do that before the end of the summer. So here's my newest baby! It's full of back to school, get to know you, seasonal, grade appropriate printables. Almost every page has CCSS standards for grades 1, 2, or 3 right on the upper corner if you need that for your plans.
You can check it out on TpT here. In case you missed it, I also uploaded a second set of EZ Prep See-it Centers. I chose bowling and a day in the park because I thought they'd both work well for back to school or even if you were working with kids in a summer program. You can find those here.
I'm currently working on my Calendar Center task cards for August and September so they can be all be finished for the full year. I will have those ready in the next day or two and I believe I'll be able to bundle those. yay! As soon as those are finished, I'm back to work full steam ahead on my Common Core Essentials packs so I can have most of those done before the year starts... Whew! I'm going to need a break from my summer break!


Back to Top