Powered by Blogger.


How I Turned Writing Task Cards Into a Printable Journal 
(So Students Can Focus on Writing, Not Formatting)

Writing task cards are a classroom staple for a reason. They’re engaging, flexible, and easy to use in writing centers, morning work, early finisher activities, small groups, and sub plans. But after using task cards for years, I noticed something important. The writing prompts weren’t the problem. The FORMAT was the problem. 


Students would grab a writing task card and immediately get stuck trying to figure out how many sentences they need to write or if they need to include an illustration. If they are tasked with making a Venn Diagram often the circles are way to small to write in and the overlap space is even smaller!  Writing centers are supposed to be independent and productive. Neither are happening if they can't get started right away and keep working during those precious few minutes at the writing center. If they're constantly interrupting your reading group to ask for assistance, then you're also losing time and productivity there as well. So, I took steps to fix that.

The Big Problem with Traditional Writing Task Cards

Traditional task cards usually require students to do two tasks at once: Understand the prompt and then create the format for their response. That second part sounds simple to adults, but for kids it’s a HUGE barrier:

  • Compare & contrast? Kids may not remember how to draw a Venn diagram correctly.

  • List writing? Kids waste time rewriting numbers or spacing.

  • Creative design prompts? Kids don’t know how much to draw vs. how much to write.

  • Poetry tasks? Students might generate ideas but struggle to organize them on paper.

Even strong writers can shut down if the task feels too open-ended.

My Solution: Task Cards + Pre-Formatted Writing Journal Pages

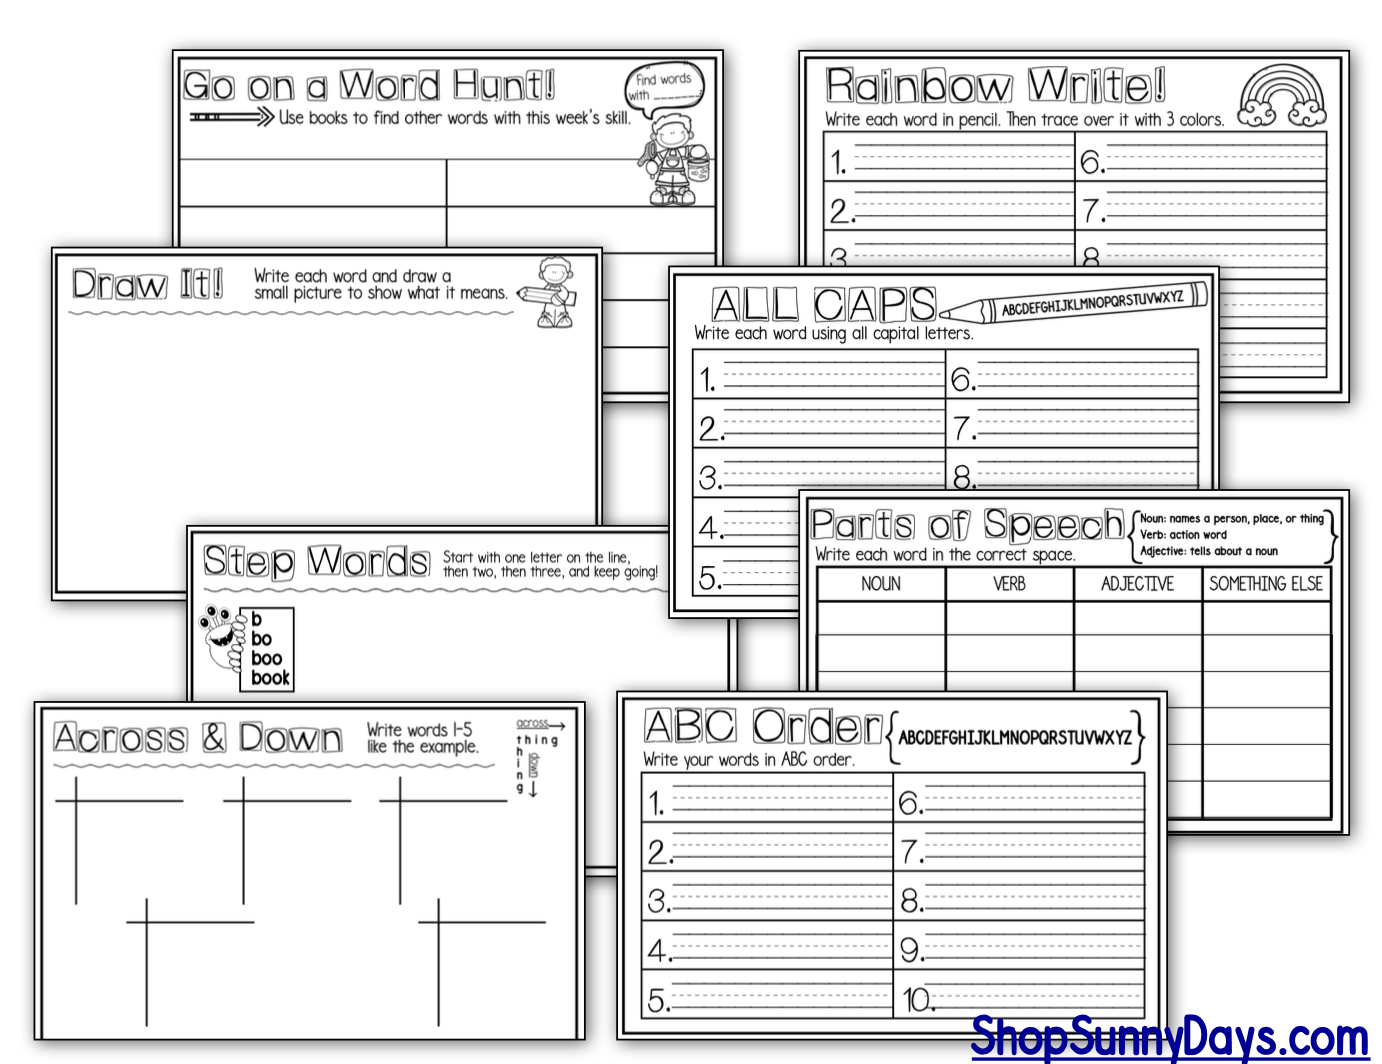
Instead of giving students blank writing paper, I created a printable journal format where each writing task already includes the response page students need.

That means students still get:
✅ the fun variety of task cards
✅ seasonal/monthly engagement
✅ creative prompts
✅ different writing types

…but now they also get:
✅ a clear structure for the response
✅ built-in organizers
✅ consistent expectations
✅ independence

The best part? It’s still low-prep for teachers. Print, staple, and teach once a month. If you are lucky enough to have parent help, this is a great task for them to do - even at home.  I used to display the task cards and give them the journals, but I've realized that the task cards are really unnecessary because the exact prompt is right on the journal page. 

Real Examples of How the Journal Improves Writing Tasks

✏️ Example 1: List + Poetry Prompt (Rhyming Words)

Instead of telling students: “List 10 words that rhyme with snow and then giving them blank paper to figure it out, the journal page already includes numbered spaces for 1-10 and writing space underneath to use those words in a poem. So students go directly into brainstorming, writing, and creating. Not formatting.


✏️  Example 2: Illustration + Labeling Prompt (Garnet Birthstone Design)

A task like designing jewelry is so engaging but kids often need structure to complete it well. In the journal format, they get a drawing space made for the task and label details. This creates stronger student work because it supports visual creativity while creating a diagram. Usually understanding a diagram comes from analyzing ones that appear in a text. Here they get a chance to create on themselves.   

✏️ Example 3: Compare/Contrast (Venn Diagram)

This is the biggest one. Traditional task cards often say “Complete this Venn diagram on your paper…” But when the journal includes the diagram, students can immediately begin comparing. That means more time using academic vocabulary, better organization, less "teacher help" needed. It also helps students who struggle with fine motor or executive functioning because the organizer is ready to go. 


Why This “Improved Method” Works 

It removes the #1 barrier to student writing: the blank page. A blank page is overwhelming for so many kids.A structured page quietly tells them: “Here’s where to start. Here’s what to do.” These journals have been a major game changer for my classroom. They are also super flexible. When I taught gen-ed students they were a fantastic bell ringer or writing center. With my first graders, I would often use it in small groups once a week. While teaching gifted students, they are amazing for early finishers. The flexibility allows you to choose which prompts you want to use and how many. Each month contains 30 writing task cards and matching journal pages. You can also print them individually and use them instead of printing and stapling a journal. Make the writing center more meaningful and engaging. Turn it from wasted time to productive energy.

Final Thoughts: Better Writing Doesn’t Always Mean “More Work”

This journal format doesn’t water down the writing process. It strengthens it because students are still doing the thinking and writing — they’re just not being held back by formatting. Task cards are still useful. The journal simply makes them work better in real classrooms.


What are teachers saying?

Want to Try This Task Card Journal Format?

If you love the idea of writing task cards but want a system that runs smoother and produces stronger writing responses, this task card + journal format is a game-changer.

Print the journal. Use the task cards. Watch writing time improve.

Click Here for January, February, March, April, May, June, Back to School ($3.75 each)

or Bundle One (Back to School -January) and Bundle Two (February-June)  ($13.75 per bundle)

In the January journal students will practice narrative, expository, and opinion writing, acrostic poems, list making, designing an award, writing a recipe, using graphic organizers to compare, letter writing, rhyming words, a book review, and more.

A sampling of this month's topics:
New Year's Celebrations
Writing Resolutions
National Cheese Month
Winter Olympics
January's Birthstone
Martin Luther King, Jr.
Betsy Ross
The Superbowl
Goal Setting
No Name Calling Week
Winter Safety Tips
Penguins

In my district, the focus on science and social studies has taken a back seat to reading and math. Like so far back that it's basically not even in the car anymore. The pendulum has swung SO far over to that side that it's really hard to cope. I miss teaching science and social studies! The kids miss it! The little bit they get in the reading series isn't nearly enough. So while I wait for that freakin pendulum to start swinging back, I will supplement with at least a little something more. 

A few years ago I created these One Sheet Wonders. I was actually inspired by children's menus. I was also guided by my desire to get as much as I can on one page and make it worth printing. This set is the one I'm currently using, so I thought I'd share it a bit with you. This set covers habitats and even though it's a supplemental material, it really does cover a lot!


The set includes a page for the ocean, desert, rainforest, polar regions, and the wetlands. Each page has a variety of activities to keep the kids engaged and interested. Some consistency among pages helps build confidence. I snuck in some handwriting practice too! My first graders can definitely use the manuscript practice and have fun with the "fancy" writing too. 


I included a set of maps that you can print and post, leave at a center, or project when you're using the page. I love to have my kids use books and other resources, but with these maps you know they'll find exactly what they need to work on the page. 


I included a cover page in case you want to print all of the habitat pages as a work packet to use over time.


See what other teachers are saying:

This page of teaching ideas is included in the download, but here's a peek:

If you're interested, you can grab this set on TpT HERE

I also have a set for Science, which you can find HERE.


And a Freebie for Earth Day HERE.


I hope you find these as useful as I do! Just a reminder, I started a You Tube channel! It's a mish mash right now, as I'm still finding my way, but so far it's just mostly me being me. I'd love for you to come visit me at Denise Speaks. 

Happy Teaching!


We're working with a new reading series and I have thoughts. Sometimes I'm so completely overwhelmed by the amount of resources that accompany the series and sometimes I'm scratching my head and searching my files because they don't provide some of the most basic activities. Sound familiar? I'm on a mission to close the gaps. I need to add some things that my kids need while also keeping my pledge of "fidelity" to the series. It feels like an arranged marriage, but here we are...

So, what I find myself looking for is easy to implement center activities that are not overwhelming, can actually be completed independently, and provide practice for the skill set forth in the series. One way I've accomplished this is my word work booklet that I blogged about here. Another are these Chunk-It Games. These games are so easy to put together and really easy for the kids to figure out. Just print and cut, laminate in there if you like, and put them in a container. I like these double sided ones from Sistema, but obviously any container will work. I like the 2 compartments, but even one sandwich sized tub or even a baggie are just fine. 


I love the idea of teaching the kids how to play a game or complete an activity that I can just change up slightly to make it fresh and exciting but the kids can rely on the independence they have from learning the basic structure of the activity. So this set of Chunk It Games fall into this exact category. The basic idea is that the kids turn over two cards, one with the blend and one with the rest of the word, they read it and decide if it's an actual word. Each game comes with the word cards, teacher notes, and ideas for classroom use.


I've created three games so far, L, S, and R blends. They're working really well for my kids, so be on the lookout for more if these seem like something you can use. Each game is $2.25 but I just bundled all three for $4.75. You can snag that bundle here.


This product may look simple, but it has been two years in the making. I created it for my students and have tested, revised, reworked, and re-tested over and over and I finally have it just right. It's become a staple in my classroom and has made center time SO MUCH EASIER. Let me tell you, I was struggling with centers in first grade. Mixing high expectations, "rigor" (don't get me started...) and kids with very little independence, below minimal reading levels, and pandemic babies who missed out on a lot of foundational skills left me frustrated to say the least. Not that this little booklet was the magical answer to all of my prayers, but it did help. A lot!


I choose 4-5 activities each week and my kids finish one page per day. My first graders and I completed each activity together over a couple of weeks before they saw it in a center. We did this instead of traditional morning work for a while so the kids could get the hang of each activity. I added a little clue, hint, or reminder at the top of each page and I really focused on that during the instruction and practice phase. I really think that helped them with independence when they saw the activities on their own.


When I taught second grade, they were able to complete most of the activities without much direct instruction. It all depends on your students.


This booklet is easy on paper and ink, fast to set up, lasts an entire week or longer, allows for differentiation, and sets up students for success and independence. The activities can be used with any word list, combined with any reading series or phonics list. It currently works with lists of 10 words, but if there is an interest I can make it suit longer lists as well.

Choose from 15 different activities that follow a familiar format but are just different enough to keep the kids interested and engaged.


This little booklet would also be great for homework or as enrichment work for your early finishers. Consider letting them keep a page in their notebook of difficult or interesting words and when they have a group of ten, they can practice them in a booklet!


Click HERE to see the booklet on TpT. It's on sale for half price through January 1st!

I have taken a HUGE step in my social media adventures. Something I never thought I would do. I've jumped into video creation with both feet! I have always been someone who avoids the camera like my life depends on it. I have never liked seeing myself in pictures and I definitely do not enjoy hearing the sound of my own voice or watching myself on video. BUT I'm doing it anyway. I'm finding that the more videos I create, the more self-accepting I'm becoming. Now, I really don't know what I'm doing. I'm filming on my phone. The lighting usually isn't great. Wow, that's really making you want to watch, huh?

Whether you're a first year teacher or a veteran, those first few minutes of a new school year can be a whirlwind! I wrote a post a while back with some other ideas for those first few minutes, including things like Play-Doh and puzzles, which you can read here

I know that sometimes your best laid plans of exciting hands-on fun can sometimes go off the rails real fast. One or two kids having a really hard time separating from their grown-ups, last minute new students, weird weather, talkative parents, late busses - they can all throw your fairy tale first day for a loop. I've been teaching for 28 years and there have been very few of those fairy tale experiences. That doesn't mean I've stopped trying though! But what I've learned to do is have a back up plan. Good old fashioned paper-pencil-crayon tasks that the kids can handle all by themselves or with the collaboration of their new friends. So for this, I created Welcome Back Packs for second and third grade, and now that I'm teaching first grade, I had to create one that I can use. I'm still deciding how I feel about teaching first, but after three years, I feel a lot more comfortable creating materials for my little firsties. Not gonna lie, I like being able to say "firsties".  I never really found a cute nickname for my second graders. (Gotta take those small victories wherever you find them. lol)  Link to Second Grade, Link to Third Grade.

So these packs are designed for the average kid to be able to handle without a lot of instruction or assistance from the teacher. That way when you are talking to parents and dealing with upset kids, collecting supplies, the rest of the class isn't just sitting and becoming restless or wandering the room. Each student will find a pack on their desk and a note on the board welcomes them and lets them know they can work on any page while we're getting settled.  The second and third grade packs have a lot of activities designed around the words two and three, to amp up the excitement of a new grade. 


Now for first grade, it's a whole different ballgame. Incoming first graders are basically Kindergarteners and it's WILD how different they all are. So for first grade I made differentiated versions of some of the pages. So, for example I wouldn't print out both of these pages, I'd choose the one that seems like the best fit for my incoming students. We're able to see some data on our kids before the first day. If that's not the case for you, I'd say go with the "easier" version and maybe make a few copies of the harder version and have them handy to give to kids who show the need for a challenge. Link to First Grade.

Same with these age pages. I consulted friends in Kindergarten and my first grade friends and got very mixed answers. If you think your kids can handle the forms of numbers mixed up choose that page, if not, then the page with the numbers in order may be better. 

You know, back to that "fairy tale" hands on  magical moment of collaboration and hands-on engagement from the first moment of the first day - some kids find that overwhelming. Lots of kids find comfort in the familiar task of sitting down and coloring, practicing their name, finding success in easy math tasks. This doesn't mean that I won't move those kids into the more collaborative tasks, but we're talking about the first moment that these little kids walk into a new environment with new people for the first time. It can be scary! Having something they know how to do gives them comfort in purpose. 


I always have some instrumental music on in the background when the kids enter the room for the first day. Usually they start working quietly and then they start chatting with new friends and a nice little happy hum starts to take over the classroom. This gives me some time to individually welcome each child, help them put their supplies away, handle tasks like attendance and urgent messages. We have to tag each kid according to their dismissal and figure out lunches and all that fun stuff. And these simple little packs help me do all that. Seems too good to be true, but it totally is my first day lifeline. Once everything gets settled, we usually gather on the carpet for a book and a fun introduction and the first day goes on as planned. I can walk through what a first day looks like in my room if anyone would like to hear about that.  So then what happens to the packet? Well, we put them in our cubbies or seat sacks and it becomes my lifeline for the next few days. Any time a situation arises that needs my attention, or we have a weird few minutes, a potty accident, or a special gets cancelled, or a lesson goes downhill fast, we can pull out our Welcome Back Pack and work a bit with our friends. 

What do I do with it after it's finished?  I flip through it with a student when they tell me they're done. It gives me that very first snapshot of a few things: effort, handwriting, following directions, basic math, coloring, and neatness. If everything seems on level with no glaring concerns, I let the kids choose a sticker for it and they take it home. I do not grade every single page or even make a mark on the paper. Now, if I see something concerning I will keep the pack, write some notes on stickies when I have a moment and then take a picture of the pages before removing the stickie notes and letting that child also choose a sticker and take home their work. Notes are very minimal, such as "handwriting - fine motor?". Just a way for me to make a note to keep an eye on any potential challenges. I don't put all my faith in this packet, it's just a very superficial first glimpse. 

However you start your first day, I hope it's amazing and only gets better from there!


I've found myself become rather passionate about two things - handwriting and spelling. Two things that are so insanely important, but seem to get pushed to the side way too often. I'll talk more about spelling soon, but you can see what I use for that in this post. As I mentioned in this post, I couldn't find what I was looking for in terms of handwriting practice, so I created a pack to use with my kids. Today I'd like to share a bit about what else you can do to help your students become more legible writers. 

The number one area to tackle is fine motor strength. If your students don't have the dexterity to properly grip the pencil, it's an uphill battle. It's hard to find time for this practice in the classroom, but it will probably help more than trying to force more pencil and paper tasks that are illegible. Consider involving parents in home practice. Anything that gets their little hands moving in purposeful tasks is helpful. Suggested exercises include using Play Do or clay, snapping legos together, stringing beads, using tweezers to move small objects from one dish to another, and squeezing stress balls, cotton balls, or pom poms. Everyday activities like cutting and coloring will also help build their hand strength. 


Size Matters! Pencil size, of course. I interviewed an occupational therapist for advice and she recommends that pencils be kept on the short size, about 6 inches, about and inch and a half shorter than most standard pencils. I found this to be recommended in several other articles regarding children learning how to write. Some suggest even shorter, just enough room for the child to execute the perfect "tripod grasp".


The graphic above, credited to Flinto, clearly shows the natural progression most children take on their way to the tripod grasp. After some experience holding writing devices from crayons to fatty pencils to regular pencils, they will hopefully be able to use their index, thumb and middle finger to hold the pencil in a tripod grip a few centimeters above the sharpened edge of the pencil. I know some people can write beautifully holding their pencil in all kinds of funky ways. I've seen it myself. This is just what is recommended and may be helpful to those struggling. 


I'm sharing some helpful items that were recommended by the occupational therapist I spoke to as well as tried and true products I've used in my own classroom. Especially notice the pencil grip. The wormlike foam tube we all know and love is not going to help if students are struggling with pencil grasp, although it may help students who just like the cushy feeling. 

Teacher's Favorite Pencils! The amazing Ticonderoga.  They've earned that reputation for a reason. They sharpen beautifully, they don't have plastic designs that clog up the sharpener, and you'll never get one of those weird ones that never seem to sharpen or have broken led inside. 

Good Erasers. Nothing beats the frustration of a kid ripping through their paper with a crappy eraser. No cutesy character shaped erasers. Did you know there are five main types of erasers? One of the lesser known, but amazing ones is a foam eraser. It's so highly rated for clean erasures of pencil from paper with limited damage to the paper. You can see them here. They are a bit pricey, so if you get any discretionary funds or parent donations, they are well worth it. 

Pencil Grips. Forget the foam tubes that slip over the end of the pencil, unless it's just for comfort. If you have kids who are really struggling, try grips like the ones below. This was something else my occupational therapist friend recommended.  Link to the Claw Grip HERE and the JuneLsy Silicone Grip HERE


If asking a kid to put pencil to paper sometimes backfires, try to practice in other ways. Fill a ziplock bag with some slime and have kids hold a pencil eraser-side down to practice writing letters. Try writing with their fingers on steamy shower doors (that's a home practice obviously), have them dip their fingers in water and write on chalkboards or sidewalks, try sidewalk chalk, use crayons, markers, whatever it takes to get them interested before the paper practice or even in between paper practice sessions. 

When you are ready for that paper practice, I welcome you to try my handwriting practice pack on TpT, which you can read all about in my last blog post HERE or find directly on TpT HERE.


Back to Top